Building a Wireless Moisture Sensor with Arduino - Part I
This spring, my partner and I received an allotment garden. Being techy, lazy, and complete integrated tech beginners, we decided to make our own wireless moisture sensor to know when we have to water. This is a blog about that journey!
Introduction
My partner and I recently got rights to rent an allotment garden nearby in the city. It is approximately 100 square metres, and took a lot of effort to turn and perma-culture to make it usable. The soil is mostly clay, which doesn’t hold too well water.
Being a bit of a techy myself, a thought occurred to me: “We have an Arduino board that we never use. What if we’d make some sort of sensor to let us know when to water?”. Very lazy, I admit, but an intriguing project.
I have some programming background, mainly in R and Android Java development, so I thought it might be an easy enough project. A few weeks in now, and we’re seeing some progression, so I reckon I could write a few blog posts about it. This is the first post.
Arduino?
The Arduino microprocessor is a tiny and cheap integrated programming development board. It has everything you need to get started with some very rudimentary microprocessing development - but the magical part about it is that it scales to almost anything.
Really, the only reason we chose the Arduino was that we have one at home. My partner had bought a starter kit some years back, which he fiddled with for a few weeks and left in a box to rot (rust?). So I thought we could use that!
Basically, the Arduino (ours is an Uno Rev3) is a small computer with a lot of input and output pins. You interact with the computer by writing code in flavoured C++, which is compiled and transferred over to the Arduino’s internal memory. Once the device has power - through USB, a battery, or even solar panels - it runs the program.
On its own, it’s not very impressive. However, the Arduino admits almost any type of sensors, attachments, and devices to plug in. To interact with the world, you have gyroscopes, accelerometers, sensors for moisture, temperature, barometers, you name it.
What’s the purpose, then?
We decided to start with one “simple” functionality: Measure the soil moisture at the allotment and transfer it wirelessly to us. This seems somewhat simple, but - as it turns out - every step has to be manually configured and constructed. Also, I need to learn C++, no biggie.
To break the steps down, we figured we need to do something like:
- Measure the soil moisture using a sensor.
- Bring that data into the Arduino.
- Do things to the data.
- Store the data.
So let’s get into what we have accomplished so far - which is mostly step one and two!
Reading the External World
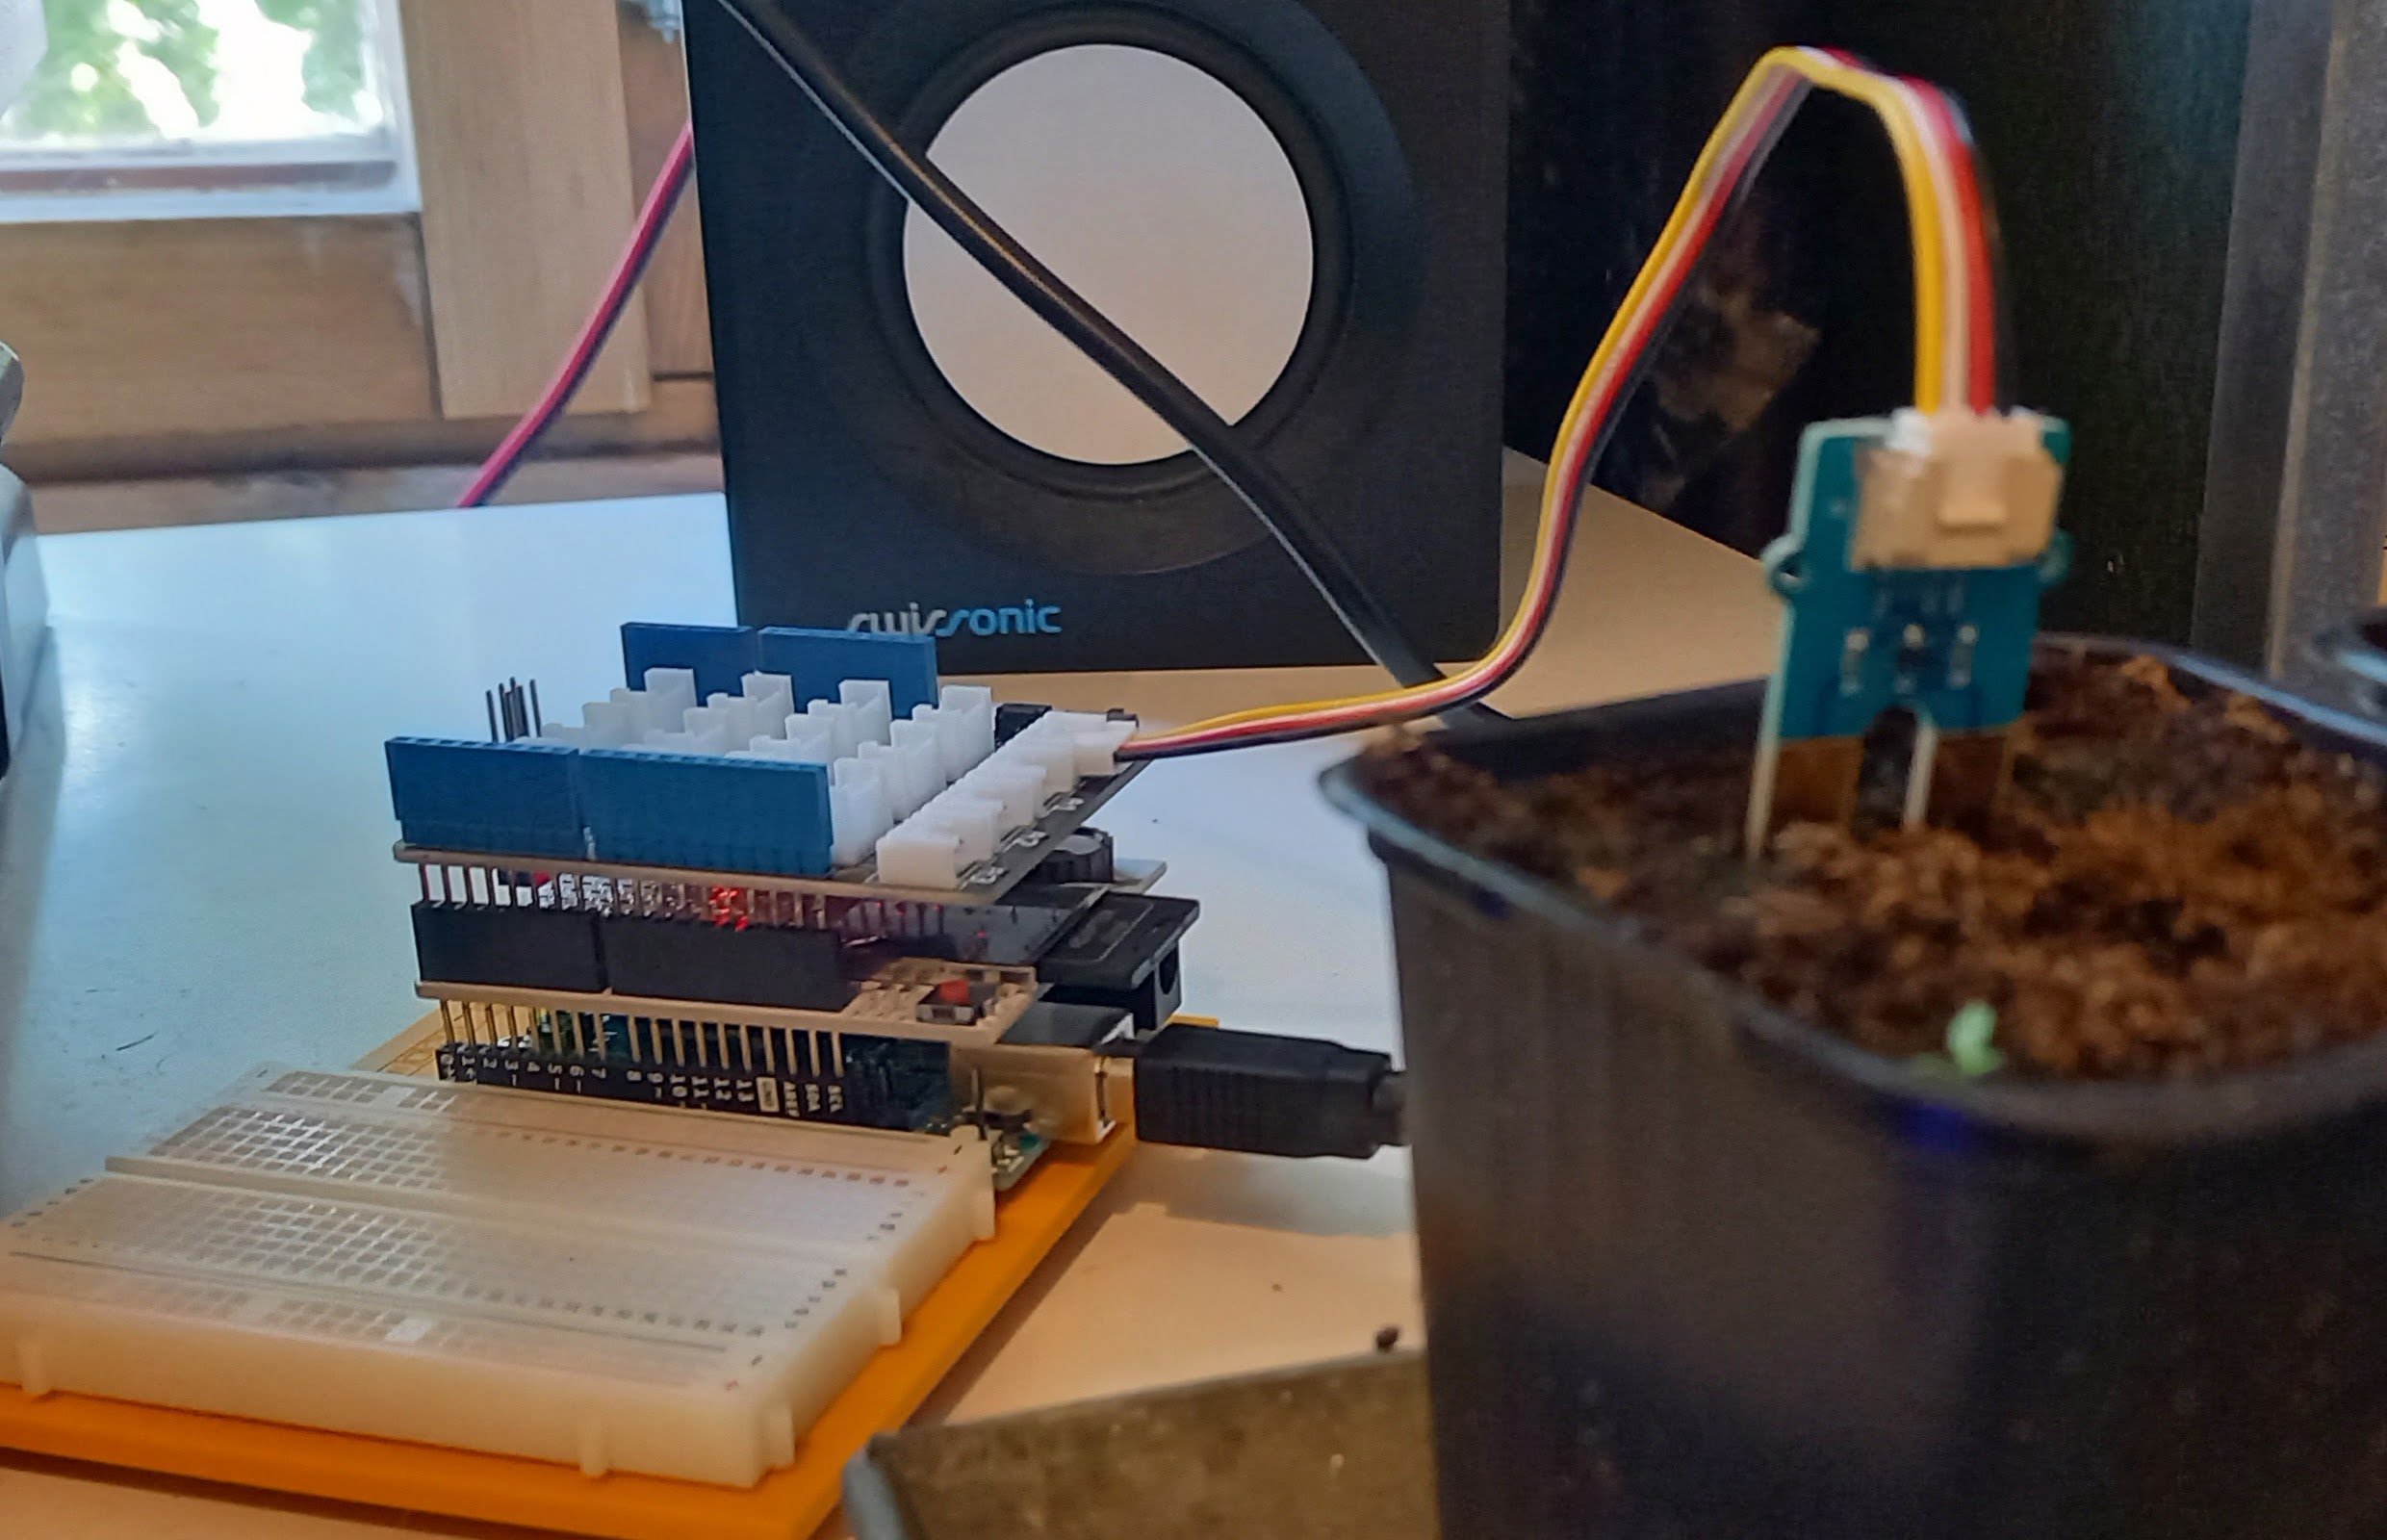
Despite what philosophers of science might argue, measuring the external world is actually very simple. For the Arduino, we opted to use the Grove ecosystem of sensors, since it seemed well-documented and easy-to-use.
Our first purchases were the Grove connector shield and a pile of moisture sensors. The connector shield simply “translates” the special four-pin connector on most Grove sensors into the pins that the Arduino reads. The word “shield” means that it sits neatly on top of the Arduino, so that you don’t have to do any wiring. Neat!
The moisture sensors are small two-pronged forks with a four-pin cable attaching to the back of the sensor. The sensor runs a current through the prongs, measures the voltage and returns it through the chosen pin. Using the connector shield, we can hook the whole thing up to the analog pins (since it is only a simple analog current that is being read), in our current case, analog pin 0.
This, essentially, takes care of step one! Of course, on its own, this does nothing - the Arduino must be told what to do with the data that comes in.
Reading from the Moisture Sensor
As mentioned, the Arduino is programmed in a language called C++ (with some extra Arduino flavour, I’ve understood). This language is pretty human-readable, though admittedly much more complex than my current working language, R. In a first, very preliminary testing setup, I managed to omit three or four semi-colons, breaking the code instantly…
Thus far, I’ve written a Sketch (the Arduino name for code scripts that are executed on the board) that takes an average of readings with a specific interval and over a defined number of readings, and prints it to the serial console (more on that later). This is the full script, in all its messy gloriness:
```{cpp}
// Setup Grove moisture pin
int sensorPin = A0;
int sensorValue = 0;

// Setup average reading
const int numReadings = 15;   // Number of readings done before reporting
const int delayTime = 1000;   // Time between readings in ms
int readings[numReadings];    // Array for storing readings, size of numReadings
int readIndex = 0;            // Index for storing readings and iteration
int total = 0;                // Storing total value for calculation
int average = 0;              // Storing average value for reporting

void setup() {
  // put your setup code here, to run once:
  Serial.begin(9600);
  // Intialize the reading array
  for (int thisReading = 0; thisReading < numReadings; thisReading++) {
    readings[thisReading] = 0;
  }
}

void loop() {
  total = 0;
  // Iterate over numReadings and write reading to array, average out and print to serial.
  for (readIndex; readIndex <= numReadings; readIndex++) {
    // Print final value and reset loop.
    if (readIndex == numReadings) {
        // Calculate value
        average = total / numReadings;
        Serial.print("Moisture average = ");
        Serial.println(average);
        // Reset the reading array
        for (int thisReading = 0; thisReading < numReadings; thisReading++) {
          readings[thisReading] = 0;
        }
      // Reset the index and start over
      readIndex = 0;
      break;
    } else {
      // If not
      readings[readIndex] = analogRead(sensorPin);
      total += readings[readIndex];
    }
  delay(delayTime);
  }
}
```
Arduino code is written in three main areas, from top to bottom:
- Libraries and variable declaration.
- The setup() function.
- The loop() function.
Area one defines which libraries are being used (if any), as well as declares all variables into memory. This is something that is not done in R, but I remember it faintly from my Java adventures some years back. Essentially, I tell the computer “Hey! I want to use a number called number later on, please reserve space for it in the memory!” which the computer then does. This is that area in the above script:
```{cpp}
// Setup Grove moisture pin
int sensorPin = A0;
int sensorValue = 0;

// Setup average reading
const int numReadings = 15;   // Number of readings done before reporting
const int delayTime = 1000;   // Time between readings in ms
int readings[numReadings];    // Array for storing readings, size of numReadings
int readIndex = 0;            // Index for storing readings and iteration
int total = 0;                // Storing total value for calculation
int average = 0;              // Storing average value for reporting
```
Here, I define which sensor pin will be read and create a variable for its value. I also seet up a number of variables to help me work the data, the most important ones being numReadings and readings[numReadings]. The former defines how many readings will be done (fifteen in this example), and the latter is an array storing the data read from each reading. The array is defined as an integer (number) array of size numReadings, so that it can fit all the necessary sensor readings. Another important variable is delayTime, which defines, in milliseconds, how long to wait between each reading.
Combining these three currently, the script is set up to take a reading every second fifteen times (i.e., over fifteen seconds).
The second area is the setup() function. This area is ran only once, when the script is executed or started. This can be when the Arduino receives power, or when I upload a new Sketch to the device.
```{cpp}
void setup() {
  // put your setup code here, to run once:
  Serial.begin(9600);
  // Intialize the reading array
  for (int thisReading = 0; thisReading < numReadings; thisReading++) {
    readings[thisReading] = 0;
  }
}
```
Here, I first tell the Arduino to begin transmitting stuff over the serial connection, i.e., the USB cable. This ensures that I can actually read what is going on in the device - otherwise everything is stuck inside it, with no direct way to access it (unless I make a way…).
After that, I initialize the results array with a bunch of zeroes. This simply fills up the fifteen-slot readings array with zeroes - once again, things R abstracts and does away with.
The real meat is in the third area, the loop() function. This is ran over and over again (hence, “loop”) for as long as the device runs, or until I somehow tell it to stop. Anything that should be repeated multiple times should go in here - like our moisture tracking!
```{cpp}
void loop() {
  total = 0;
  // Iterate over numReadings and write reading to array, average out and print to serial.
  for (readIndex; readIndex <= numReadings; readIndex++) {
    // Print final value and reset loop.
    if (readIndex == numReadings) {
        // Calculate value
        average = total / numReadings;
        Serial.print("Moisture average = ");
        Serial.println(average);
        // Reset the reading array
        for (int thisReading = 0; thisReading < numReadings; thisReading++) {
          readings[thisReading] = 0;
        }
      // Reset the index and start over
      readIndex = 0;
      break;
    } else {
      // If not
      readings[readIndex] = analogRead(sensorPin);
      total += readings[readIndex];
    }
  delay(delayTime);
  }
}
```
The code contains a few nested things, i.e., things inside of things. The main stuff happens inside the for loop. This loop starts from the value of readIndex, which in the start is zero, and runs repeatedly, every time incrementing readIndexby one. Finally, when the index becomes equal to the number of readings I want to do, we stop. Essentially, thus, it represents every reading that I want to do.
Inside this loop exists an if-else statement. The first part, under if, is executed if the index is equal to the number of readings, and represents the case of “We’re done now, time to wrap up and leave.” The second part, under else, is executed in all other cases - meaning every reading we do.
Starting with the else section (since it, paradoxically, is the main stuff we’re doing here), I take a reading from the moisture sensor using analogRead(sensorPin) and store it in its place in readings. I then add it to a total, and we’re done! Before the for loop exists, I delay execution for the amount of time I defined in-between readings, so that we don’t read a million-billion times a second.
The if statement is executed when I’ve determined that I’ve had enough readings, so it should only run once for every average reading. It simply calculates the average, prints it to the serial console, and resets the relevant variables for a new average reading. The seriar console is a small box inside the Arduino IDE (the software I write this stuff in), which can function as a kind-of screen for anything I want. Finally, the break keyword is used to tell the computer, “Stop this loop immediately!”. This means that the loop is guaranteed to stop, and nothing underneath the keyword is ran.
(And as I was writing this blog, it occurred to me: this means that the delay is not executed, throwing the whole thing off slightly! I will fix this in the next iteration, probably by removing the break altogether.)
The product of this whole code snippet is some average moisture levels, as measured in voltage. Since the text is not very cool to look at, I used the Serial Plotter function inside the Arduino IDE to produce a cute little plot of the values coming in:
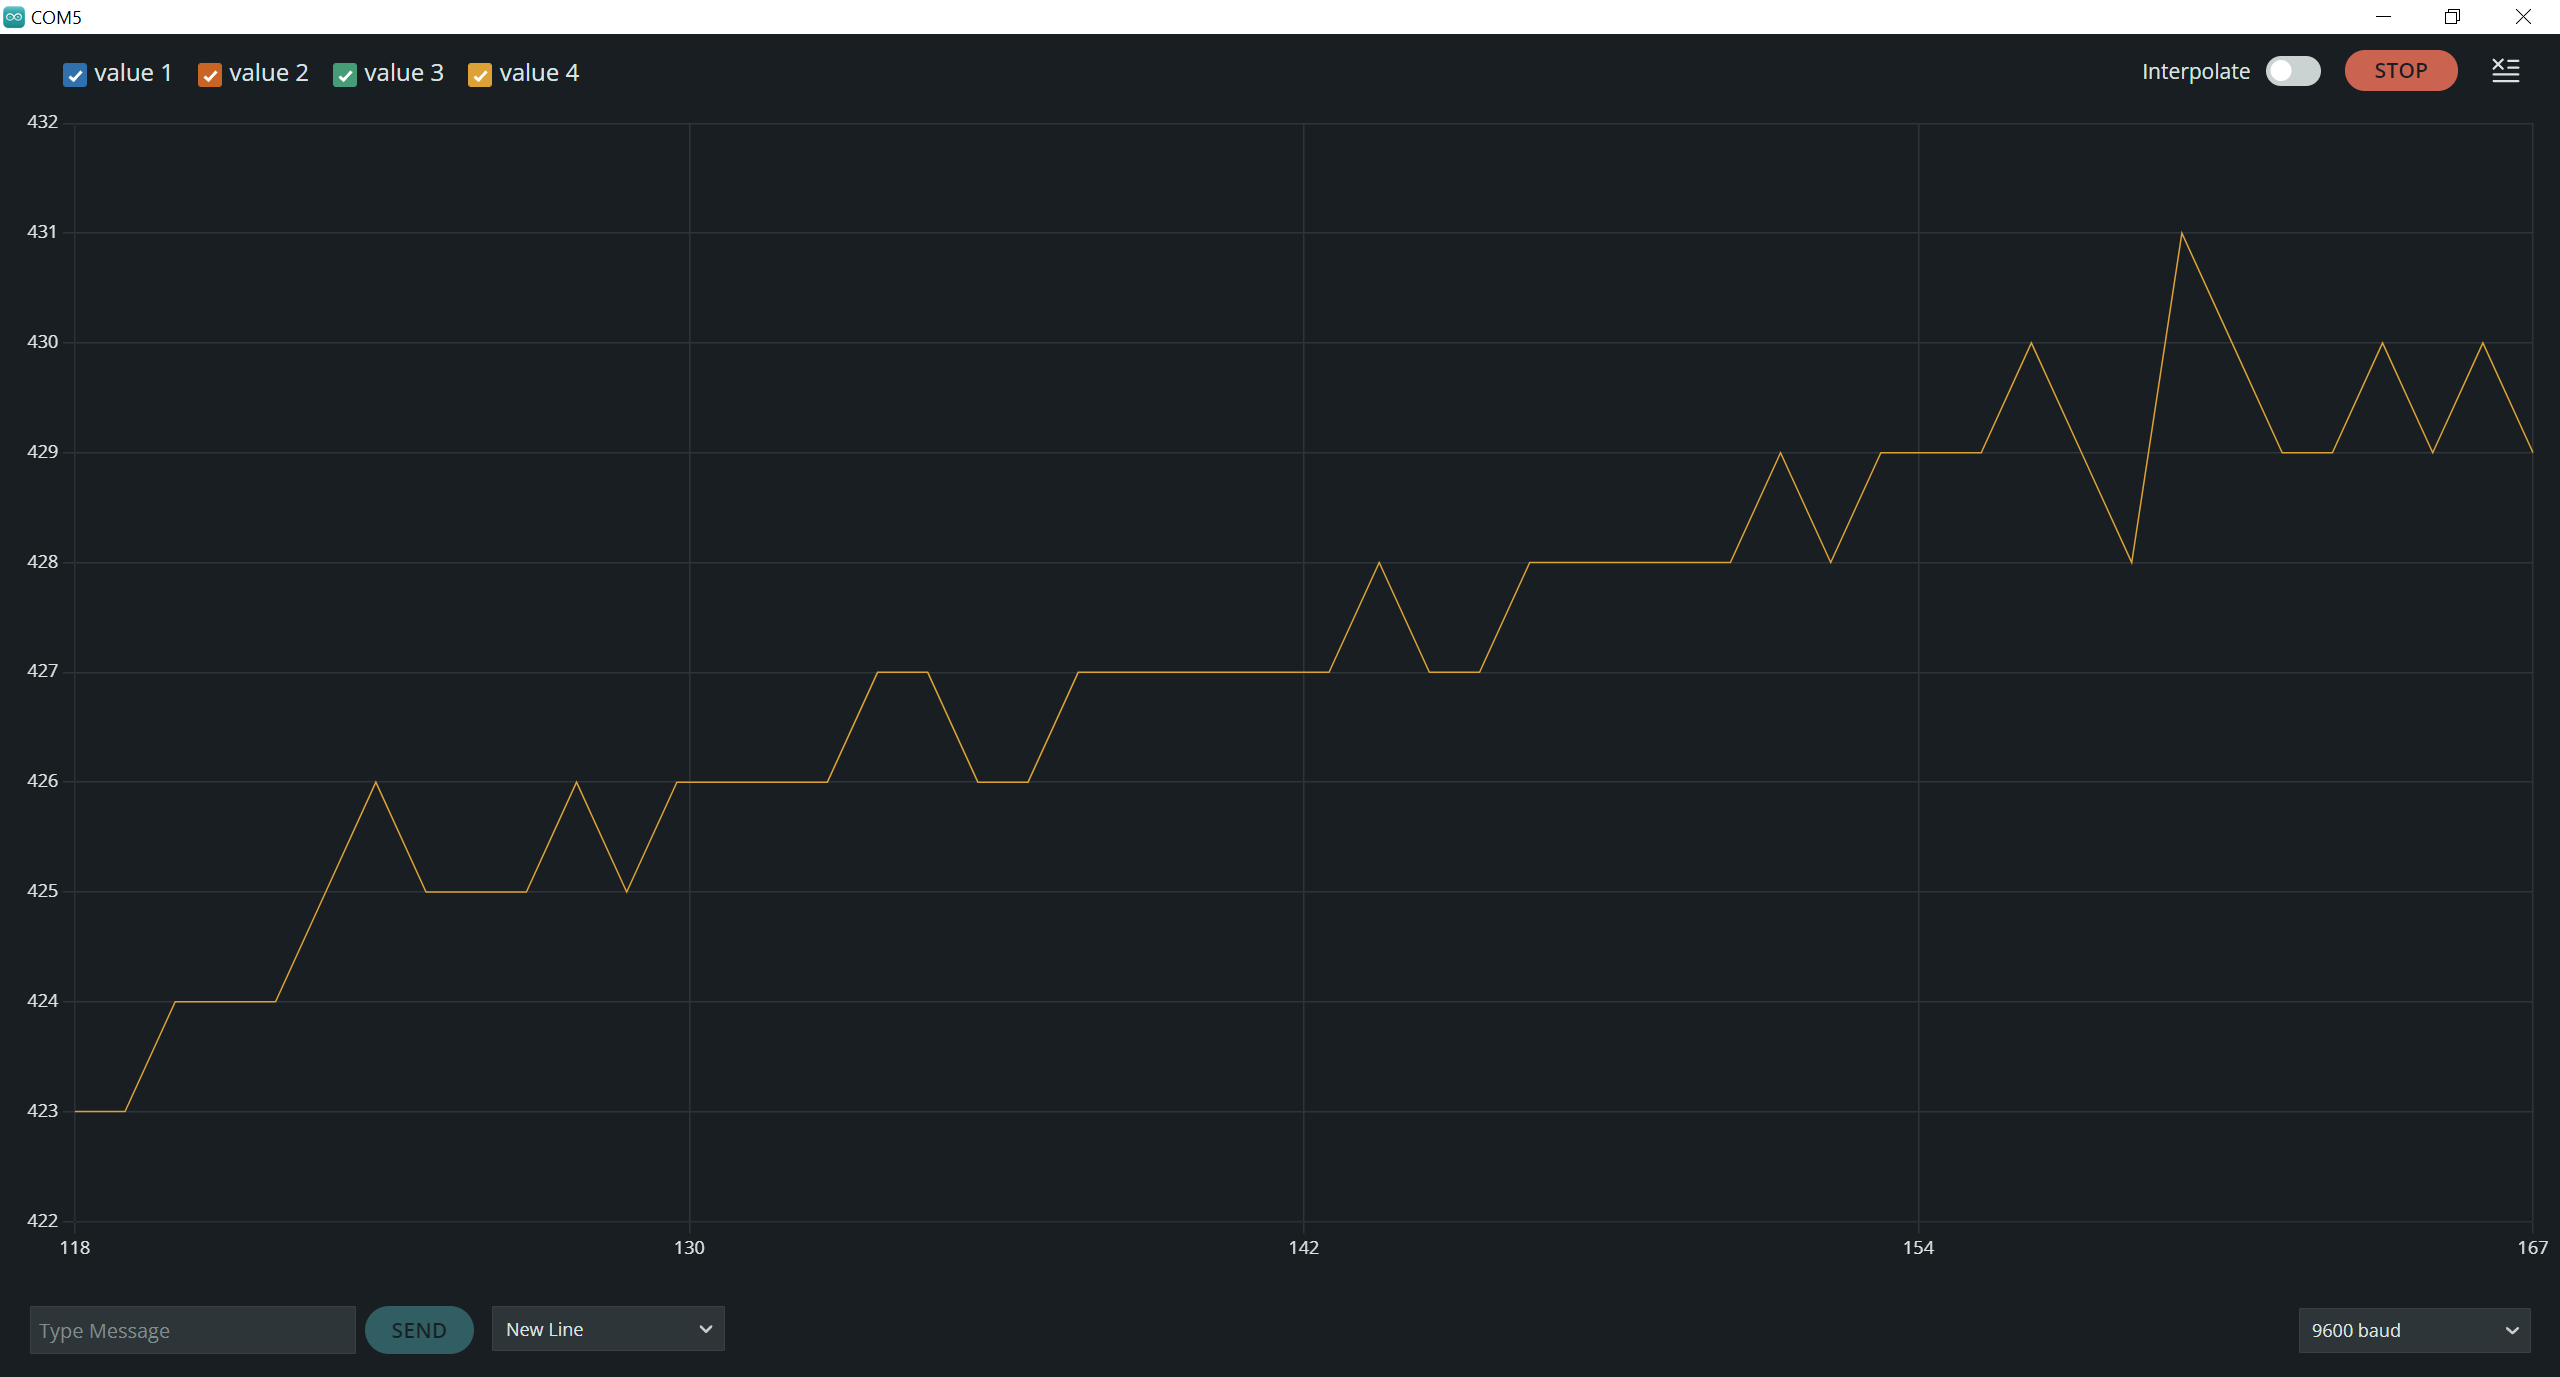
In this particular interval, the moisture level was going up. Since the plant had been sitting out in the heat the whole day, I presume this was some sort of “getting used to”-situation. Alternatively, it could be water precipitating out of the soil - I genuinely have no idea, I’m a social scientist!
What Now?
This concludes step two, and to a certain extent step three, of the process. The next part will look at storing this data, as currently, I have no storage medium available. However, as the picture showed, I went and bought a data logging shield today, which comes with SD card storage. My current thought is to push the data into the EEPROM (essentially, some slightly more stable memory that persists through power failure), and then read from the EEPROM and write to the SD card in more infrequent intervals.
The main difficulty, however, will be the wireless transmission. As it turns out, there are plenty of options, some free, some expensive, all difficult to set up. Currently, I’m leaning towards a LoRaWAN implementation, but we’ll see as things progress.
The data should be wirelessly transmitted to the Arduino IoT cloud, from where I’d be pulling it into a webapp for stats graphing (yay!) and an Android app for sending automated notifications when the soil is running dry.
Other things still on the list include weatherproofing this whole shebang, and figuring out power (solar power, baybee! Unless it turns out to be infeasible). There’s a whole lot left, so I’ll return with more blogs - thanks for reading! :)
Citation
@online{saal2023,
  author = {Saal, Oliver},
  title = {Building a {Wireless} {Moisture} {Sensor} with {Arduino} -
    {Part} {I}},
  date = {2023-06-28},
  url = {https://osaal.github.io/posts/arduinoadventure01.html},
  langid = {en}
}